Want to enable your developers to deploy highly available web applications, web services or microservices?
Do you also need to cater for existing and legacy workloads?
Sounds like your requirements are in the sweet spot between what OpenStack and Kubernetes has to offer.
OpenStack is as you may already know a mature, stable and flexible cloud platform which can help you make the resources (CPUs, RAM, disks, networks, load balancers) in your datacenter available on a self-service and fully automated basis to your consumers.
Kubernetes is simply put an excellent engine for automatically keeping your application workload up to date and highly available, and it is quite happy doing that by consuming resources from a underlying OpenStack cloud.
Why Octavia?
Historically the OpenStack Neutron project has carried a built-in load balancer implementation. This implementation never gained support for high availability nor TLS termination. Its design put limitations on the scalability of the service as it was deployed directly in namespaces on the Neutron gateway nodes. This pattern also made it harder to replace the core load balancing software itself should you want to do that.
The Octavia project is a redesign and re-implementation of a load balancer service for OpenStack and it has become the de-facto reference implementation of the LBaaS v2 API. Among other things it addresses both the scalability- and core software exchangeability issue by managing a fleet of virtual, containerized or metal load balancers.
Great, how do I get started?
-
Deploy Ubuntu OpenStack with a Octavia overlay
snap install --classic charm
charm pull cs:openstack-base
cd openstack-base
curl https://raw.githubusercontent.com/openstack-charmers/openstack-bundles/master/stable/overlays/loadbalancer-octavia.yaml -o loadbalancer-octavia.yaml
juju deploy ./bundle.yaml --overlay loadbalancer-octavia.yaml- Configure Octavia-internal client/server certificates
Octavia uses mandatory bi-directional certificate based authentication between the controller components and the load balancer instances. Note that these certificates will not be used for actual payload data, only internal management traffic. You should nevertheless procure/issue certificates that meets the security requirements and guidelines of your organization before putting the service into production.
mkdir -p demoCA/newcerts
touch demoCA/index.txt
touch demoCA/index.txt.attr
openssl genrsa -passout pass:foobar -des3 -out issuing_ca_key.pem 2048
openssl req -x509 -passin pass:foobar -new -nodes -key issuing_ca_key.pem \
    -config /etc/ssl/openssl.cnf \
    -subj "/C=US/ST=Somestate/O=Org/CN=www.example.com" \
    -days 365 \
    -out issuing_ca.pem
openssl genrsa -passout pass:foobar -des3 -out controller_ca_key.pem 2048
openssl req -x509 -passin pass:foobar -new -nodes \
        -key controller_ca_key.pem \
    -config /etc/ssl/openssl.cnf \
    -subj "/C=US/ST=Somestate/O=Org/CN=www.example.com" \
    -days 365 \
    -out controller_ca.pem
openssl req \
    -newkey rsa:2048 -nodes -keyout controller_key.pem \
    -subj "/C=US/ST=Somestate/O=Org/CN=www.example.com" \
    -out controller.csr
openssl ca -passin pass:foobar -config /etc/ssl/openssl.cnf \
    -cert controller_ca.pem -keyfile controller_ca_key.pem \
    -create_serial -batch \
    -in controller.csr -days 365 -out controller_cert.pem
cat controller_cert.pem controller_key.pem > controller_cert_bundle.pem
juju config octavia lb-mgmt-issuing-cacert="$(base64 controller_ca.pem)" \
lb-mgmt-issuing-ca-private-key="$(base64 controller_ca_key.pem)" \
lb-mgmt-issuing-ca-key-passphrase=foobar \
lb-mgmt-controller-cacert="$(base64 controller_ca.pem)" \
lb-mgmt-controller-cert="$(base64 controller_cert_bundle.pem)"- Deploy glance-simplestreams-sync charm
To deploy workloads ontop of OpenStack with Juju your Glance image database needs to contain some cloud images and Juju needs a index to locate them. The Glance SimpleStreams Sync charm takes care of this for you.
juju deploy cs:glance-simplestreams-sync --to lxd:0 --config source=ppa:simplestreams-dev/trunk
juju add-relation glance-simplestreams-sync keystone- Adjust Octavia configuration for HA
Note that there are many more steps required for a fully Highly Available controlplane and dataplane across the stack, but this demonstrates Octavia HA features for the load balancer dataplane component itself.
juju config octavia loadbalancer-topology=ACTIVE_STANDBY spare-pool-size=4- Wait for deployment to complete and settle
watch -c juju status --color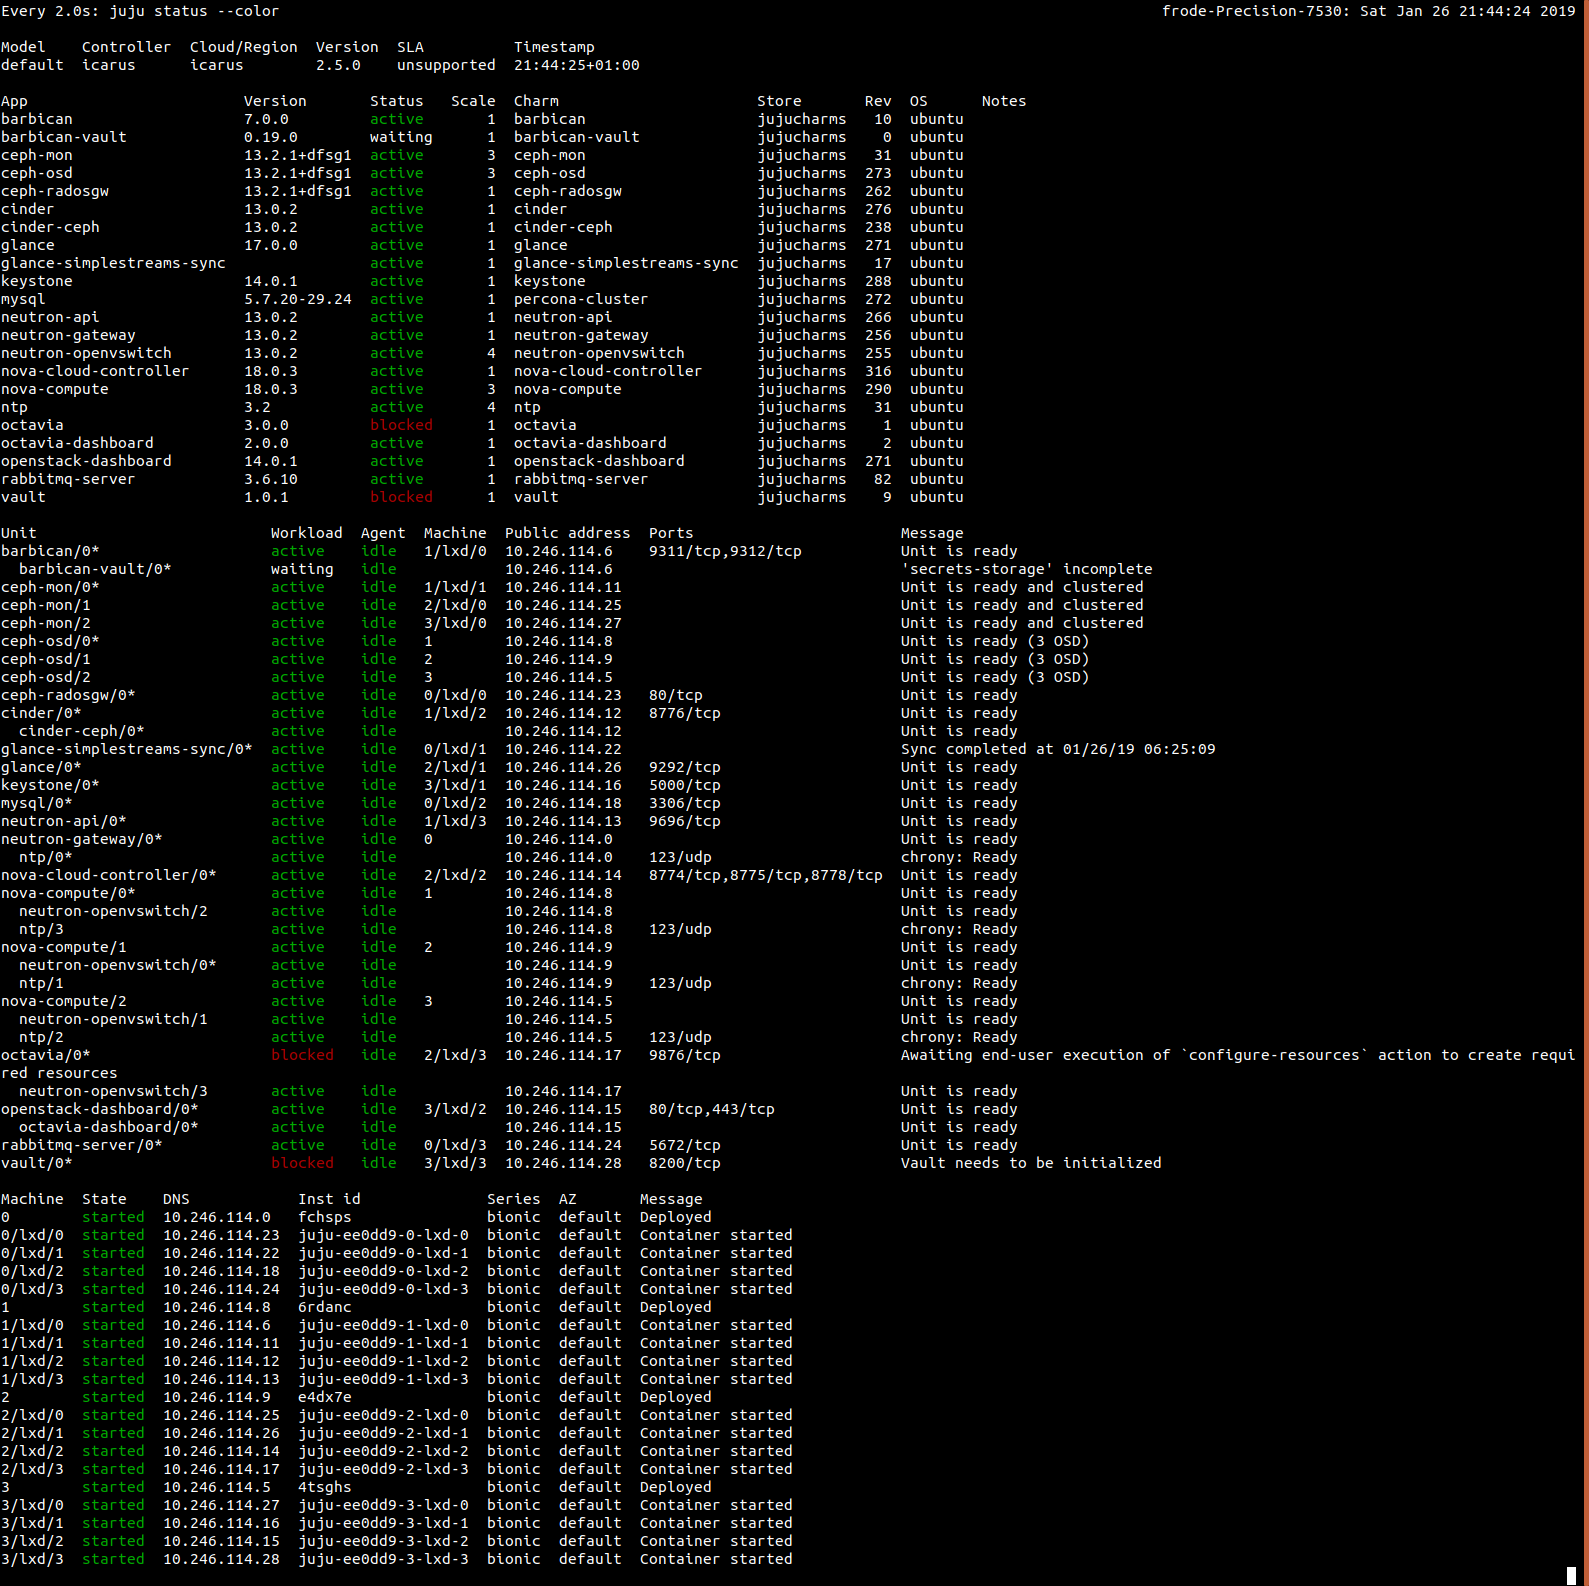
Don’t worry about the barbican-vault and vault units being in waiting and blocked state at this stage. Using barbican and vault to store your TLS keys will be covered in a future post.
- Run post-deployment Octavia configuration
Octavia relies on resources within your OpenStack cloud to operate, these will be created for you by executing a charm action. At the time of this writing you will have to take care of the Octavia Amphora image yourself.
juju run-action --wait octavia/0 configure-resources
openstack image create --tag octavia-amphora \
     --container-format bare --disk-format qcow2 \
     --file images/amphora-x64-haproxy.qcow2 \
     octavia-amphora
Take a look at the Octavia LBaas Appendix of the OpenStack Charms Deployment Guide for instructions for how to build an amphora image.
- Prepare your OpenStack project for deployment of Kubernetes
Note that for simplicity this example will update your default security group to allow all traffic to your instances, it also makes use of the default admin project. You will probably want to create a separate project and use more fine grained security groups before putting this into production.
. ./openrcv3_project
PROJECT_ID=$(openstack project show --domain admin_domain admin -f value -c id)
SECGRP_ID=$(openstack security group list --project ${PROJECT_ID} | awk '/default/ {print $2}')
openstack security group rule create ${SECGRP_ID} \
	--protocol any --ethertype IPv6 --ingress
openstack security group rule create ${SECGRP_ID} \
	--protocol any --ethertype IPv4 --ingress
openstack flavor create --ram 512 --disk 8 tiny
openstack flavor create --ram 1024 --disk 10 small
openstack flavor create --vcpus 2 --ram 2048 --disk 20 medium
openstack flavor create --vcpus 2 --ram 3584 --disk 20 juju
openstack flavor create --vcpus 4 --ram 4096 --disk 20 large
openstack flavor create --vcpus 12 --ram 16384 --disk 40 xlarge
openstack network create --external --provider-network-type flat \
	--provider-physical-network physnet1 ext_net
openstack subnet create --network ext_net --no-dhcp \
	--subnet-range 192.168.122.0/24 --gateway 192.168.122.1 \
	--allocation-pool start=192.168.122.2,end=192.168.122.254 Internet
NETWORK_ID=$(openstack network create network -f value -c id)
openstack subnet create subnet --network network \
    --subnet-range 10.42.0.0/24
openstack router create router
openstack router set --external-gateway ext_net router
GATEWAY_IP=$(openstack router show router -f value -c external_gateway_info \
	| awk '/ip_address/ { for (i=1;i<NF;i++) if ($i~"ip_address") print $(i+1)}' \
	| cut -f2 -d\")
openstack router add subnet router subnet
openstack quota set --cores 100 ${PROJECT_ID}
openstack quota set --instances 100 ${PROJECT_ID}
sudo ip route add 10.42.0.0/24 via ${GATEWAY_IP}
cat <<EOF > cloud-inception.yaml
clouds:
inception:
type: openstack
auth-types: [ userpass ]
regions:
RegionOne:
endpoint: $OS_AUTH_URL
EOF
juju add-cloud inception cloud-inception.yaml
juju bootstrap inception \
--config network=${NETWORK_ID} \
--model-default network=${NETWORK_ID} \
--model-default use-default-secgroup=true- Deploy Kubernetes on OpenStack
There is a openstack-integrator charm available, that after you have sanctioned it with your trust, gets the keys from your OpenStack and sets up your Kubernetes with them.
It can also give information required for Kubernetes to use OpenStack LBaaS if you configure the appropriate options.
Get the UUID of the subnet and the UUID from the external network created above and configure the openstack-integrator charm.
juju deploy cs:~containers/kubernetes-core
juju deploy cs:~containers/openstack-integrator
juju add-relation openstack-integrator kubernetes-master
juju add-relation openstack-integrator kubernetes-worker
juju config openstack-integrator subnet-id=<UUID of subnet>
juju config openstack-integrator floating-network-id=<UUID of ext_net>
juju trust openstack-integrator- Wait for deployment to complete and settle
watch -c juju status --color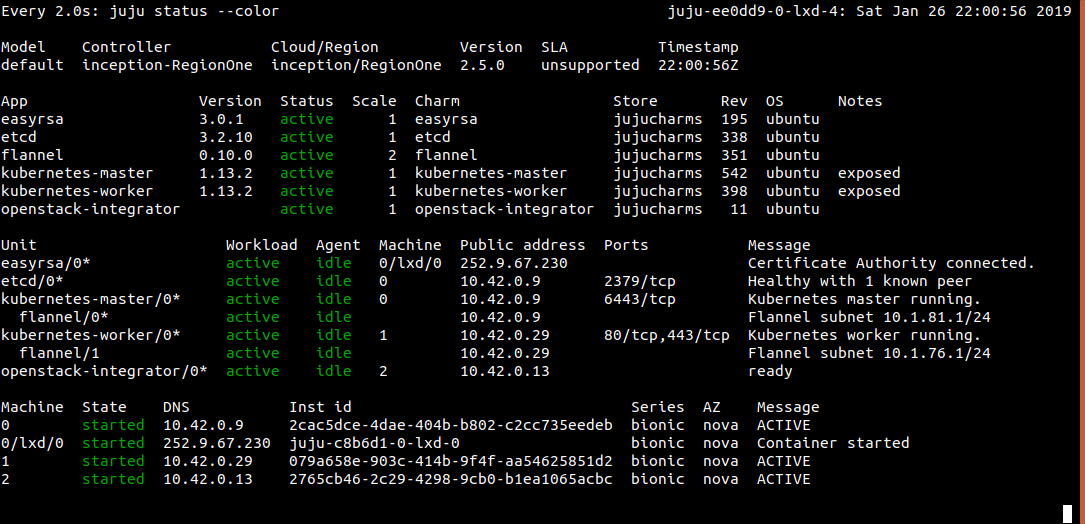
- Get Kubernetes credentials, launch and watch sample app
mkdir ~/.kube
juju scp kubernetes-master/0:config ~/.kube/config
sudo snap install kubectl --classic
kubectl run hello-world --replicas=5 --labels="run=load-balancer-example" --image=gcr.io/google-samples/node-hello:1.0  --port=8080
kubectl expose deployment hello-world --type=LoadBalancer --name=hello
watch kubectl get svc -o wide --selector=run=load-balancer-example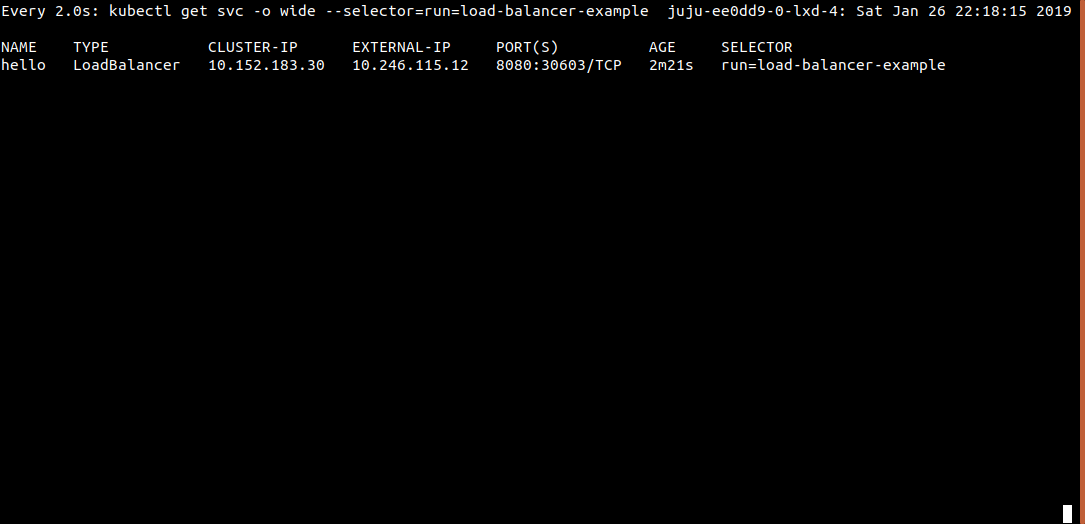
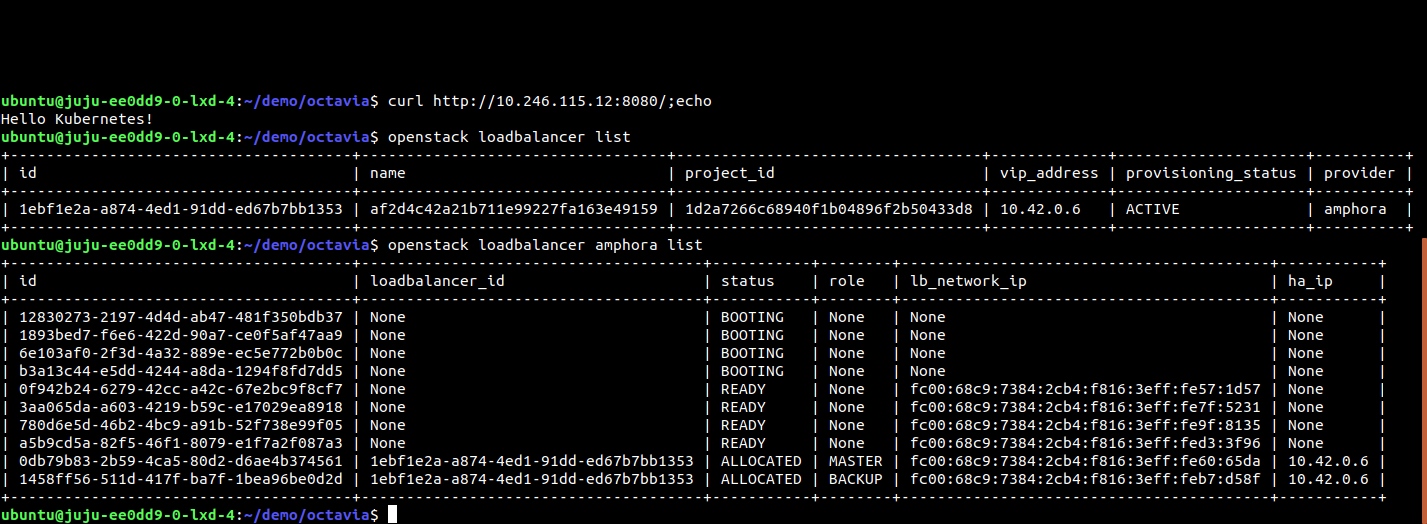
Behind the scenes Kubernetes will now request and configure a load balancer from your OpenStack. It will also request and configure a floating IP for it and expose it to the world.
To meet the request Octavia will boot up or commission two of its idle load balancer instances, plug them into your network, create a VIP port and configure VRRP between the two load balancer instances.
UPDATE 2020-06-07: Add link to Octavia LBaas Appendix of the OpenStack Charms Deployment Guide.